
Cadence Mini Pouch Hacks
- Shelly Andrews

- Oct 27, 2025
- 6 min read
I had an absolute blast sewing up not one, but two awesome hacks for the Cadence Mini Pouch! The wider gusset and larger opening take this pattern to a whole new level of amazing. Then if the larger zipper opening is not your thing, no worries. The 2nd hack will be more your style. I’m beyond thrilled to finally share every detail on how to make your own. I’m so excited to see everyone’s incredible modified Mini Cadences!
-Shelly Andrews
In order to sew the Cadence hacks you will have to first have a copy of the Cadence Mini Pouch pattern. You can grab that here.
Seam Allowance is per original #5 pattern instructions unless otherwise stated.
Hack #1: The Zip Around Cadence Mini allows the Cadence to open much wider than the original.
You will need the following pieces:
Main Body: Cut 2 Exterior and 2 Lining pieces (from the Cadence Mini Pouch Pattern)
Zipper Panel: Cut 2 Exterior and 2 Lining pieces that are 1 1/2 inch by 12 3/8 inch
Bottom: Cut 1 Exterior and 1 Lining that are 2 5/8 inch by 2 ¾ inch
#5 Zipper Tape: Cut 1 at 12 1/2 inches long
Double Fold Bias Binding
2 #5 Zipper Pulls


Optional Slip Pocket
Take 1 original Main paper pattern piece and cut ¼ inch above the gusset marks. This will be your slip pocket pattern piece. Cut 2 lining pieces
Step #1 Main Panel Construction
Take your Main Body Exterior and Lining pieces and find your top and bottom center marks. Once you do that you will want to put 1 Main and 1 Lining piece WST. Baste them together. Repeat for the other pieces. If you want to add the original webbing and snap/swivel that the Cadence has. Add that to your back piece before you baste them together.


Step #2 (Optional Slip Pocket)
Place your slip pocket pieces RST and sew them together at a 1/4 inch seam allowance along the straight edges. Turn them WST, press, and topstitch (if desired). Align the center of the bottom of the slip pocket with the bottom center marking of your Back Main Body and clip in place. Baste around the raw edges to attach your slip pocket to the back lining piece. Set aside.


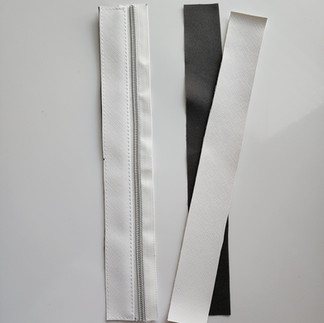
Step #3 Zipper Gusset Construction
Find the centers for all zipper panels and zipper tape using your preferred method. Take 1 Exterior Zipper Panel and lay your zipper tape RST (teeth down). You can choose to baste your zipper in place first OR you can take your 1 Lining Zipper Panel and place it RSD against the zipper tape. Sew together with the full seam allowance


Pull the exterior and lining pieces WST and clip. Topstitch the zipper panel . Baste the 3 remaining sides.


Repeat with the other panel.
Make sure to add your zipper pulls NOW


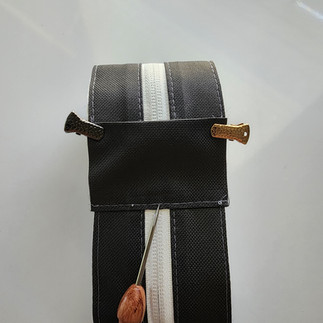
Step #4 Bottom
Have you added your zipper pulls yet?
Grab your Exterior Bottom and Lining pieces. Clip the longer side (2 3/4 inch) of the Exterior Bottom piece RST with one side of the Zipper panel. If the bottom is a little big that is okay. That just means your zipper tape may have been a little narrower. Now clip the lining piece RST to the lining side of the zipper panel. Your Zipper panel should now be sandwiched between the bottom pieces. Sew together.


Take the bottom piece and pull it WST. Topstitch.


Lay your Zipper panel RSU with the bottom piece at the top. Pull the Bottom Lining down and out of the way. Take the raw (unsewn) edge of the Zipper Panel and bring it up RST to meet the Bottom Exterior piece. Sew together at a 3/8 seam allowance.


Now fold the Bottom Lining piece WST about 3/8 of an inch and clip to hold in place.


Place a piece of DST just inside the seam allowance.


Take the DST off and place the lining slightly over the stitch line. Topstitch the lining to the Bottom Exterior from the Exterior side. This will secure the lining in place. Sew the sides of the Bottom Exterior.


Find the center of the bottom panel. and mark.
Step #5 Gusset to Exterior
Take one of your Exterior pieces and lay it on your workspace RSU. Make sure your completed Gusset is WSO (lining side up). If you made the optional slip pocket, make sure the opening is pointed towards the zipper panel. Match up your top and bottom center points. You will want to snip into your gusset to help curve around the corners. Do not snip pass 1/4 inch. Now sew the gusset to the Main Body per pattern instructions.


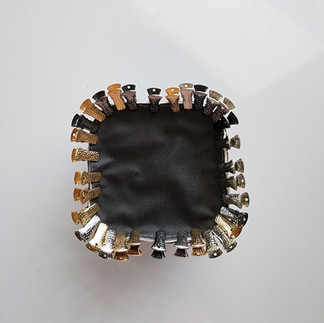
Attach your binding using your preferred method


Repeat for the other side.
Turn your Cadence Mini right side out and smooth out the corners.
You have just finished your Zip Around Cadence Mini!


Now for the 2nd Modification. That is right you get 2 today!
Hack #2: Centered Zipper allows the Cadence Mini Pouch to have just that. A centered zipper.
You will need the following pieces:
Main Body: Cut 2 Exterior and 2 lining (from the Cadence Mini Pouch Pattern)
Zipper Panel: Cut 2 Exterior and 2 Lining pieces that are 1 1/2 inch by 7 1/4 inch
Bottom: Cut 1 Exterior and 1 Lining piece (from the Cadence Mini Pouch Pattern)
Zipper: Cut 1 at 7 1/2 inches
Fold over Elastic (FOE) Cut to fit Slip pocket
Double Fold Bias Binding
2 #5 Zipper Pulls


Optional Slip Pocket
Take 1 original Main paper pattern piece and cut ¼ inch above the gusset marks. This will be your slip pocket pattern piece. Cut 2 lining pieces.
Step #1 Main Panel Construction
Take your Main Body Exterior and Lining pieces and find your top and bottom center marks. Once you do that you will want to put 1 Main and 1 Lining piece WST. Baste them together. Repeat for the other pieces. If you want to add the original webbing and snap/swivel that the Cadence has. Add that to your back piece before you baste them together.


Step #2 (Optional Slip Pocket)
Place the Slip Pocket pieces WST. Grab your Fold over Elastic (FOE). Sandwich the FOE around the Slip Pocket straight edge. Make sure that the raw edge of the slip pocket is pushed into the fold. Topstitch along the non-fold side (marked in white). Align the center of the bottom of the slip pocket with the bottom center marking of your Back Main Body and clip in place. Baste around the raw edges to attach your slip pocket to the back lining piece. Set aside. .


Step #3 Zipper Gusset Construction
Find the centers for all zipper panels and zipper tape using your preferred method. Take 1 Exterior Zipper Panel and lay your zipper tape RST (teeth down). You can choose to baste your zipper in place first OR you can take your 1 Lining Zipper Panel and place it RSD against the zipper tape. Sew together with the full seam allowance


Pull the exterior and lining pieces WST and clip. Topstitch the zipper panel . Baste the 3 remaining sides.


Repeat with the other panel.
Make sure to add your zipper pulls NOW


Step #4 Bottom
Have you added your zipper pulls yet?
Grab your Exterior Bottom and Lining pieces. Place your completed zipper panel RSU on your work space. Place your Bottom Exterior RST to one short edge of the Zipper panel. Grab your Lining Bottom piece and clip it so it is RST with the lining. side Sew along that clipped short edge. Pull the bottom pieces WST and topstitch.


Now take the Bottom Exterior and clip it RST to the unsewn edge. Flip the Bottom lining up RST to the lining side. The zipper should now be sandwiched between the pieces again. Sew together.


Turn the completed Gusset RSO. Topstitch the last sewn seam. Baste the sides of the Bottom Exterior.
Find the center marks of your bottom exterior.


Step #5 Gusset to Exterior
Take one of your Exterior pieces and lay it on your workspace RSU. Make sure your completed Gusset is WSO (lining side up). If you made the optional slip pocket, make sure the opening is pointed towards the zipper panel. Match up your top and bottom center points. You will want to snip into your gusset to help curve around the corners. Do not snip pass 1/4 inch. Now sew the gusset to the Main Body per pattern instructions. This Gusset fits like a glove. Ease it in. It is okay to make more snips further down the gusset. . Sew the gusset to the main per pattern instructions.


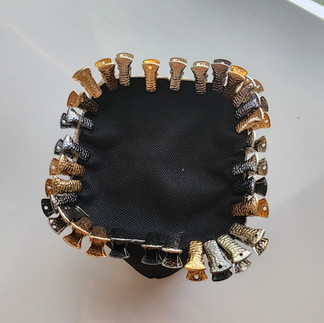
Attach your binding using your preferred method.


Repeat for the other side.
Turn your Centered Zip Cadence Mini right side out and smooth out the corners.
Yay! You have finished your Centered Zip Cadence Mini!


Comments